
This tutorial provides a step-by-step guide to applying ArchiMate, a standard enterprise architecture modeling language, to a small business scenario. Based on the case study of “Coffee Around The Corner,” we’ll explore how ArchiMate helps manage organizational complexity, align business activities with technology, and improve communication during change initiatives. ArchiMate, as outlined in resources like “ArchiMate 101: A Practical Introduction,” emphasizes structured modeling over ad-hoc drawings to create coherent, reusable architectural descriptions.

The tutorial is divided into three main sections mirroring the case study: (1) Defining the Enterprise Context, (2) Modeling the Core Architecture, and (3) Communicating the Architecture Through Viewpoints. We’ll cover key ArchiMate concepts, provide examples from the coffee shop, and include practical tips for implementation. By the end, you’ll understand how to use ArchiMate’s layers, elements, and viewpoints to model a simple enterprise.
1. Defining the Enterprise Context (Motivation and Scope)
Key Concepts
- Enterprise Architecture (EA): EA is a practice for understanding an organization’s structure, processes, and technology to manage change effectively. It focuses on coherence—ensuring all parts of the business align—rather than detailed implementation.
- Motivation and Scope: Before modeling, define the “why” (motivation) and “what” (scope). This includes identifying the enterprise’s purpose, stakeholders, challenges, and how architecture supports decision-making.
- ArchiMate’s Role in Coherence Phase: ArchiMate excels in the “Coherence” phase of EA work, where the goal is a high-level, unified overview. It’s not for exhaustive details but for ensuring consistency across business, applications, and technology.
Example from “Coffee Around The Corner”
- The Enterprise: This is a small coffee shop run by Paul and Linda. Paul handles logistics (suppliers, stock, raw materials), while Linda manages pastries and accounting. The shop offers hot drinks, French pastries, complimentary water, and entertainment like pool tables. It’s a simple setup but relies on coherence between daily operations and supporting tools.
- The Challenge: The shop uses a single external SaaS (Software as a Service) solution for all needs (e.g., inventory, accounting). Without proper modeling, changes like adding home delivery could disrupt alignment between business activities and technology.
- ArchiMate’s Application: Use ArchiMate to create a coherent model that visualizes how business goals (e.g., serving customers) connect to technology (e.g., the SaaS tool), helping manage growth or external dependencies.
Tutorial Steps
- Identify Stakeholders and Purpose: List key actors (e.g., owners like Paul and Linda, customers, suppliers) and the business’s core purpose (e.g., providing drinks and pastries).
- Define Challenges: Assess gaps, such as reliance on one SaaS tool, which could be a single point of failure.
- Set Scope: Focus on high-level coherence rather than minute details. Use ArchiMate to map motivations (e.g., efficiency in logistics) to architectural elements.
Tip: Start with a simple diagram or mind map before diving into ArchiMate notation. This ensures the model addresses real needs.
2. Modeling the Core Architecture
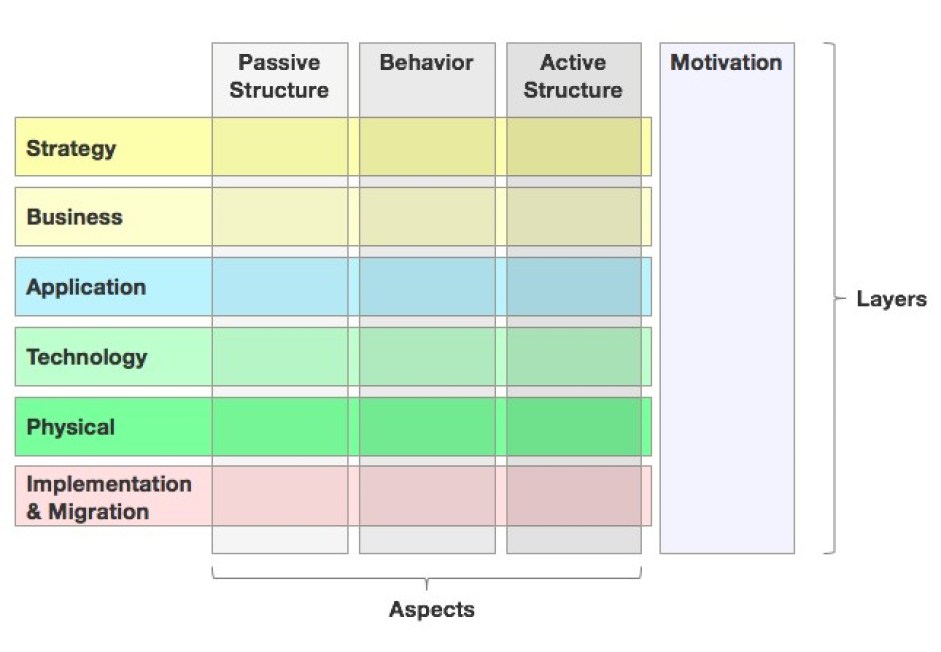
ArchiMate’s Core domain divides architecture into three layers: Business, Application, and Technology. Each layer has elements categorized by type:
- Active Structure: Entities that perform work (e.g., actors, components).
- Behavior: Actions or processes (internal for the organization, external for customers).
- Passive Structure: Things acted upon (e.g., data, objects).
We’ll model each layer using examples from the coffee shop, emphasizing nesting—a visual technique for showing relationships without explicit lines.
A. Business Layer: Actors, Behavior, and Conceptual Information
This layer models the organization’s people, processes, and high-level data.
| Element Type | Key Concept | Example from Coffee Shop | Description |
|---|---|---|---|
| Business Actor (Active Structure) | Represents individuals or groups that perform roles. Can be decomposed for detail. | Employees (decomposed into Paul and Linda). | Paul and Linda are nested inside “Employees” to show they form the core team. This uses nesting for simplicity, avoiding formal composition relationships. |
| Business Function (Internal Behavior) | Internal activities or processes, focused on “what” is done, not “how” or “when.” | Inventory, Accounting, Purchasing. | These are tasks Paul and Linda handle daily, ensuring stock levels and finances align with operations. |
| Business Service (External Behavior) | Behaviors visible to external parties, like customers. | Serving Hot Drinks; Hypothetical Home Delivery. | Customers experience “Serving Hot Drinks” as a service, which aggregates internal functions like purchasing and inventory. |
| Business Object (Passive Structure) | Abstract data or resources accessed by actors and behaviors. | Raw Materials, Products, Customers. | These represent conceptual “stocks” like coffee beans (raw materials) or customer records, manipulated by business functions. |
Modeling Principle: Nesting: In diagrams, nest elements (e.g., Paul inside Employees) to imply containment. This is non-normative (not strictly required by ArchiMate) but aids communication for non-experts.
Tutorial Steps:
- Map Actors: Identify roles and use nesting for hierarchy.
- Define Behaviors: Separate internal (functions) from external (services).
- Add Passive Elements: Link objects to behaviors (e.g., Inventory function accesses Raw Materials object).
- Diagram It: Use tools like Archi or draw.io to create a layered view.
B. Application Layer: Software Components and Data
This layer focuses on applications supporting business activities, excluding generic tools.
| Element Type | Key Concept | Example from Coffee Shop | Description |
|---|---|---|---|
| Application Component (Active Structure) | Software entities that realize business functions. | Small Business Solution (SaaS). | A single cloud-based tool supporting all aspects like inventory and accounting. It’s deployed as a unit, not broken into sub-apps. |
| Data Object (Passive Structure) | Structured data specific to applications. | N/A (general use implied). | A Business Object like “Order” might split into multiple Data Objects (e.g., Order Header, Order Lines) for relational databases. |
Key Concept: Distinguish from Business Layer—here, focus on software realization, not conceptual business info.
Tutorial Steps:
- Identify Components: List apps directly tied to business (e.g., exclude email clients).
- Model Data: Map Business Objects to application-specific data.
- Connect Layers: Use relationships like “Realization” (Application realizes Business) or “Serving” (Application serves Business).
C. Technology Layer: Infrastructure and Physical Files
This layer covers underlying hardware and software infrastructure.
| Element Type | Key Concept | Example from Coffee Shop | Description |
|---|---|---|---|
| System Software (Active Structure) | Generic software like OS or databases (commodity items). | N/A (general use implied). | Operating systems on shop devices, excluded from Application Layer as they’re not business-specific. |
| Device (Active Structure) | Hardware elements. | N/A (general use implied). | POS systems, computers, or networks supporting the SaaS tool. |
| Artifact (Passive Structure) | Concrete files or data. | N/A (general use implied). | Physical files like backups or logs, contrasting abstract Business/Data Objects. |
Tutorial Steps:
- Separate from Applications: Only model infrastructure here.
- Link Upward: Use “Assignment” relationships (e.g., Application Component assigned to Device).
- Keep It High-Level: For small businesses, this layer might be minimal if relying on cloud SaaS.
Overall Modeling Tip: Use ArchiMate’s relationships (e.g., Composition for parts, Flow for interactions) sparingly; rely on nesting for initial models to reduce complexity.
3. Communicating the Architecture Through Viewpoints
Key Concepts
- Viewpoints: Tailored views of the model for specific stakeholders, filtering elements to match their concerns. They ensure relevance and avoid overwhelming details.
- Stakeholders and Purpose: Define who (e.g., investors, security officers) and why (e.g., decision-making, validation).
- Customization: Use standard ArchiMate viewpoints (e.g., Overview) but adapt with non-standard conventions for clarity.
- Nesting for Simplicity: Nest elements (e.g., servers in network zones) instead of explicit relationships.
- Visual Emphasis: Color-code risks (e.g., red for high-risk flows) and add labels like “risk” for accessibility.
Example from “Coffee Around The Corner”
- Stakeholder: A bank’s security officer (CISO-like) reviewing for investment.
- Purpose: Validate security in a “Deciding” viewpoint to gain agreement.
- Custom Viewpoint: Limit to concepts like Node (servers) and Communication Network (zones). Nest servers in zones for easy understanding. Highlight risky flows (e.g., shop-to-SaaS connection) in red with “risk” labels.
Tutorial Steps
- Identify Concerns: Match stakeholder needs (e.g., security risks).
- Select Elements: Choose a subset (e.g., Technology Layer only for infrastructure views).
- Customize Visualization: Apply nesting and colors; ensure accessibility (e.g., labels for color-blind users).
- Create Views: Use ArchiMate tools to generate diagrams; test with stakeholders for feedback.
Tip: Viewpoints turn complex models into actionable insights. For small businesses, start with 2-3 viewpoints (e.g., Business Overview, Technology Risks).
Conclusion and Best Practices
This tutorial demonstrates ArchiMate’s power for small enterprises like “Coffee Around The Corner” by providing structured models that foster coherence and informed decisions. Key takeaways:
- Use layers to separate concerns.
- Leverage elements and nesting for clear, communicative models.
- Tailor viewpoints to stakeholders for effective change management.
Kickstarting ArchiMate Modeling with Visual Paradigm
Visual Paradigm is a powerful, Open Group-certified tool for ArchiMate (supporting up to version 3.2 as of late 2025), offering full compliance with the language’s vocabulary, notation, syntax, and semantics. It excels in enterprise architecture (EA) modeling, with strong integration for TOGAF ADM, viewpoints, and cross-layer relationships. As of December 2025, it includes cutting-edge AI-powered features for ArchiMate diagram generation, making it an excellent choice for beginners and experienced architects alike.
There are two primary approaches to getting started: Traditional Visual Modeling (manual drag-and-drop) and AI-Powered ArchiMate Diagram Generation. Many users combine both for optimal results. Below, I’ll recommend a kickstart strategy, explain each approach, and review pros/cons.
Recommended Kickstart Approach: Start with AI-Powered Generation, Then Refine with Traditional Modeling
- Why this hybrid? AI quickly overcomes the “blank canvas” problem by generating a compliant starting model from a simple text prompt, saving hours on initial setup. You then switch to traditional tools for precise refinements, ensuring accuracy and full control.
- Steps to Begin:
- Download the latest Visual Paradigm Desktop (Enterprise Edition required for full ArchiMate AI support).
- Go to Tools > AI Diagram Generator.
- Select “ArchiMate” as the type and choose an official viewpoint (e.g., Business Process Cooperation or Application Cooperation).
- Enter a natural-language prompt describing your enterprise (e.g., “Model a small coffee shop with business services for hot drinks and pastries, supported by a SaaS inventory application and cloud infrastructure”).
- Generate the diagram – it appears instantly, fully editable.
- Refine manually: Add/remove elements, adjust relationships, apply nesting, or create additional viewpoints.
- Use built-in examples/templates for inspiration if needed.
This approach leverages AI for rapid prototyping while using traditional tools for professional polish.
1. Traditional Visual Modeling
This is the classic method: Create a new ArchiMate diagram, use the palette to drag elements (e.g., Business Actor, Application Component), connect with relationships, and apply viewpoints.
- How to Start:
- New Project > ArchiMate Diagram.
- Use the resource catalog or palette for elements.
- Apply pre-defined or custom viewpoints for stakeholder-specific views.
- Leverage nesting for visual hierarchy and import from Archi® if migrating.
| Pros | Cons |
|---|---|
| Full precision and control over every element and relationship. | Time-consuming for initial setup, especially complex models. |
| Deep learning of ArchiMate concepts through hands-on placement. | Steep learning curve for beginners (remembering notations/relationships). |
| Seamless integration with other diagrams (e.g., link to BPMN for detailed processes). | Risk of inconsistencies if not careful with large models. |
| Robust features like viewpoint management, TOGAF guide-through, and collaboration. | No “smart” assistance for layout or suggestions. |
2. AI-Powered ArchiMate Diagram Generation
Introduced/expanded in late 2025, this feature (via AI Diagram Generator and AI Chatbot) instantly creates compliant ArchiMate diagrams and viewpoints from text prompts. It supports all official viewpoints and generates editable models.
- How It Works:
- Text-to-diagram: Describe your architecture (e.g., topic, requirements, or scenario).
- Optional: Specify viewpoint, tone, or details.
- Output: Professional, laid-out diagram ready for import/refinement.
- Also available via conversational AI Chatbot for iterative refinements (e.g., “Add a risk to the SaaS connection”).
| Pros | Cons |
|---|---|
| Extremely fast – generates complex, viewpoint-structured models in seconds. | Outputs may need validation/review (AI can misinterpret nuances). |
| Lowers entry barrier: Ideal for beginners or quick prototypes. | Requires clear, detailed prompts for best results. |
| Supports all official viewpoints automatically. | Dependent on latest version and Enterprise Edition license. |
| Accelerates stakeholder communication with instant visuals. | Less “educational” – you might bypass learning notations deeply. |
Overall Pros and Cons of Visual Paradigm for ArchiMate
| Aspect | Pros | Cons |
|---|---|---|
| Features | Certified compliance, full viewpoint support, TOGAF integration, migration from Archi, real-time collaboration. | Resource-intensive (can feel heavy on older hardware). |
| Usability | Intuitive interface, extensive templates/examples, AI boosts productivity. | Complex licensing (ArchiMate AI needs Enterprise Edition). |
| Value | All-in-one (ArchiMate + UML/BPMN/TOGAF), strong for teams. | Higher cost for full features compared to free tools like Archi®. |
Final Recommendation
- For Beginners/New Projects: Start with AI-Powered Generation to build momentum and get a solid baseline quickly.
- For Experts/Refinement: Always follow up with Traditional Modeling for accuracy.
- Best Overall: Use both – AI for kickstarting and ideation, traditional for detailed EA work. This hybrid maximizes speed without sacrificing quality.
Visual Paradigm’s 2025 AI enhancements make it one of the most forward-thinking ArchiMate tools available. Try the free trial or online version to experiment – it’s a great way to apply concepts like those in the “Coffee Around The Corner” case study! If you’re modeling a small business, prompt the AI with your enterprise description for an instant layered view.